Music Library
- Have a large collection of local music files?
- Hate bloated software to organize your files that comes tied to other services (cough… iTunes… cough)?
- Need to create and move playlists to multiple devices or drives?
- Have Microsoft Office already?
This file is for you!
The Music Library database
This tool is a Microsoft Access based database that will list and re-organize your music files and allow you to create standard M3U playlists compatible with any player, and easily populate thumb drives or other portable storage to take your media with you.
Files supported: mp3, m4a, mp4, m4p, wma (possible more, but that’s what I use)
Requirements for Use
The database is compatible with any version of Microsoft Access from 2007 or newer. This is compiled for 32bit office installations. The Access runtime freely available from Microsoft will work as well, but the 2013 version seems to display things a bit better.
External applications are used to support some fancy features:
- Playback is done though whatever music player you have as your Windows default
- Tag editing is done with MP3Tag
- Volume normalization is supported using MP3Gain
Download
A pre-compiled version of the database is available for download here
Support
You’re looking at it. This is programmed for personal use and in spare time, the cost for getting this file for free is that I’m not offering any support. You can message me if you like, but I may not be able to help you out.
System Setup
The System tab gets you started with the database

Application Settings
- KeySearch – This setting changes the search box behavior from one key at a time search while you type (true), to wait until your done typing and hit enter to search (false). Helpful if your database is large and searching is slow
- LibraryLocation – This is the path to your music files. It can be local or on a network
- MP3Gain_Path – the location of the external program MP3Gain, used to fire off command line tasks to the gain program
- MP3Tag_Path – the location of the external program MP3Tag, used to fire off the program for editing file tags
- RelativePath – This setting changes the way playlists are stored, true means the playlist refers to files starting at the location of the playlist file, while false will store playlists with the entire file path.
- SupportedFiles – This is a comma separated list of files the database will catalog and list.
Setup Process
The first thing to do is set where your library is located. Double click the Option Value area to pull up a file dialog and navigate to the root directory of your files.
With the path set, click Populate Library to build the database. This will take a little bit depending on how many files you have.
Maintaining Files
The other functions on this tab are used to clean up your library
- Re-Scan Library – This will go through all files and add anything not already in the database. Useful if you’ve added files manually or through another program.
- Validate Files – Verifies that all files listed in the database have a valid file in the location to play. If you move or delete stuff from the library, the database can end up with dead links. This will show you files that are dead.
- Missing Tags – This lists any files in the database that do not have tag information to use. This will provide tools to use MP3Tag to clean up these files.
- Duplicate Files – This shows you any files in your library that are duplicated based on tag information Artist, Album, Title and give you functions to delete them.
- Move Library – This will copy or move all library files to a new location. The resulting files will be organized in folders like this: Artist\Album\Song file. This one is a bit tricky since it depends on good tag data, use carefully especially if you select to delete files from the old location.
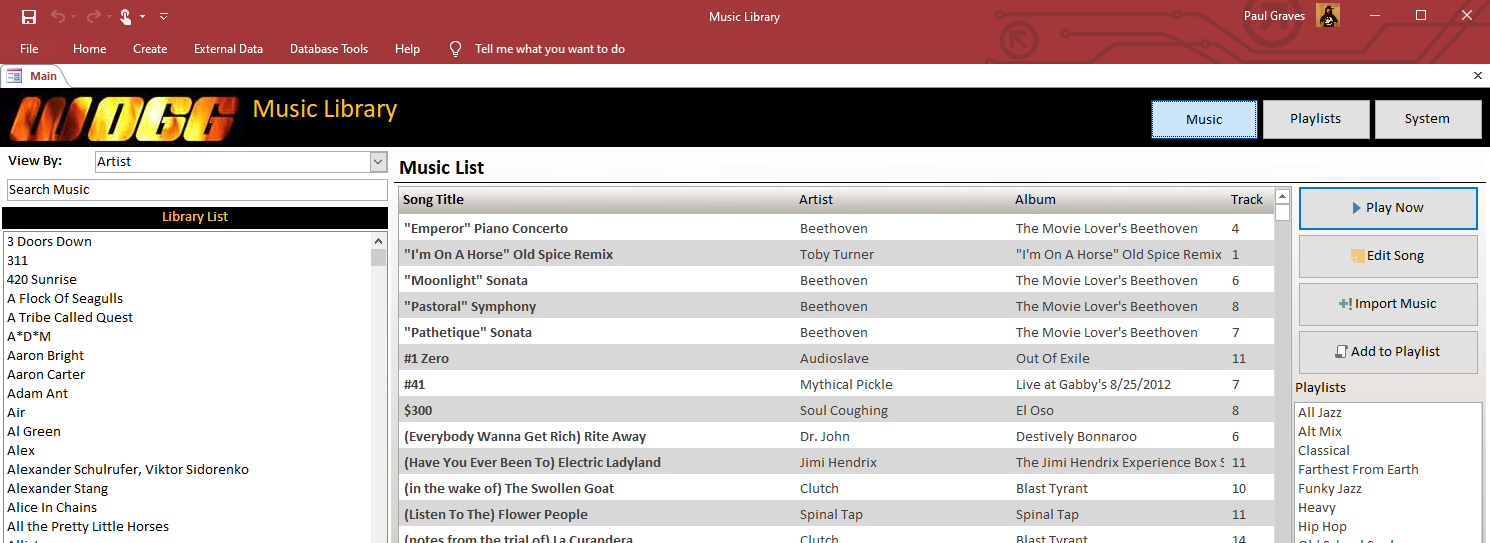
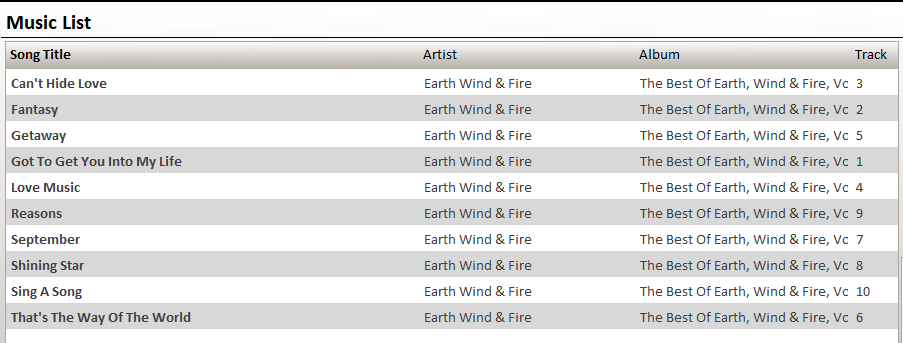
Music List
The Music tab shows all songs in the database for searching, playing and adding to playlists
The search area is on the left.
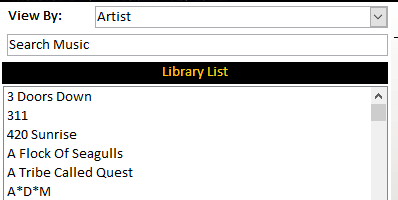
Default view is by artist, click the drop down to search by album name instead. Enter whatever in the “Search Music” box and the library list will be filtered to match, as will be the song list.
Double click or clear the search music box to go back to viewing all music.
Clicking anything in the Library List section immediately filters for that album or artist.
The Music List area has a few sneaky double click actions
Double clicking the song title adds that song to a playlist, either the selected playlist or a new one if nothing is selected.
Double clicking the Artist or Album will show you the song detail information.

This window shows everything the database has on that song. You can edit the song information here if you like, but you really should use the file tag information to make sure everything is matching.
To the right of the screen there are a handful of functions and a playlist list.
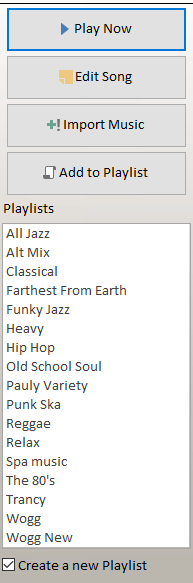
Play Now – The current list in the window will be sent to the default media player using a standard M3U playlist file.
Edit Song – This will get you that same Song Edit screen that you get from double clicking
Import Music – This will pull up a new screen to bring new music files into the library (more on this later)
Add to Playlist – This will add everything in the display list to the selected or a new playlist in the database
Playlists – This shows a list of all the playlists in the database already defined. Select one to be the target of a single song double click or the use of the Add to Playlist button. Double click the playlist to navigate to that playlist using the Playlists tab
Create a New Playlist – use this to prompt for a new playlist when using the single song double click or the use of the Add to Playlist button.
Importing Music
This is the best way to add to your library, as it will ensure the file structure of Artist\Album\File is consistent and not cause you problems when exporting structured files and playlist data later.
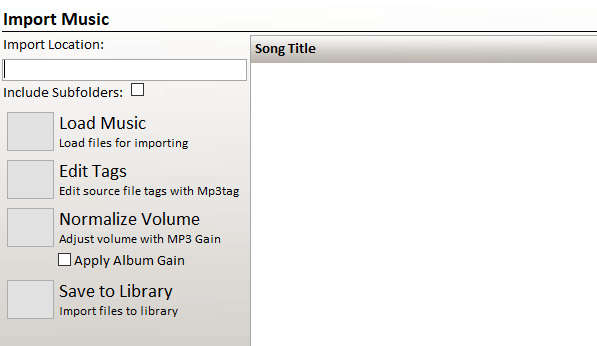
Type or click the Import Location to list files for adding to the database. Typically this will be in a temporary location instead of already within your library location.
Click Load Music to list what the database finds in the location.
Click Edit Tags to correct any missing or bad tag data. If you correct things, click Load Music again to ensure your changes are captured.
Normalize Volume will start a command line MP3Gain task to set the volume of the files. This is done non-destructively and without a re-encode so you don’t lose quality, check out MP3Gain documentation for details. Selecting Apply Album Gain will set the volume for all files as a collection instead of a per file target.
Save to Library will copy the files to your library location and add them to the database when you’re all set.
Playlists Tab
Here’s where you create or maintain playlists in the system.
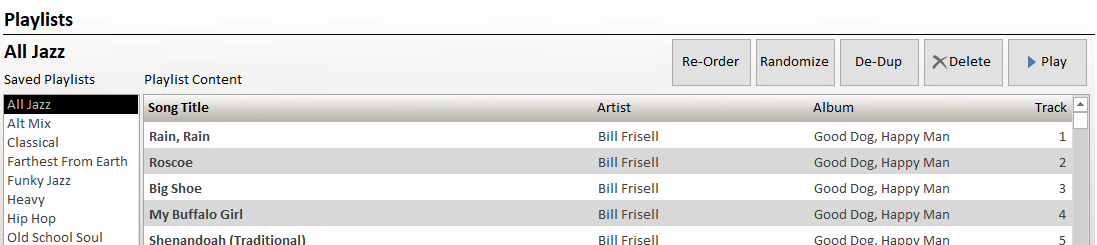
Click a playlist in the saved playlists area to show what is in that playlist. There are some more sneaky double click actions here.
- Double clicking a song in the playlist will prompt to remove that song from the list
- Double clicking the artist or album will still pull up the Edit Song screen.
The buttons at the top do the following:
- Re-Order – Sort the playlist by Artist, Album, then track #
- Randomize – Put the playlist into a random order
- De-Dup – Looks for duplicates and removes them based on Album, Artist, and song title
- Delete – Remove the entire playlist from the database
- Play – Send the playlist to your default player
Library List changes
The library search list on the left now does a slightly different thing. Searching and selecting an artist or album and double clicking will now add all of those files to the currently selected playlist.
Additional Functions
At the bottom of the playlist screen is another set of buttons

- Save – Saves the current playlist in the root of the library directory
- Save As – Saves the current playlist in a location of your choosing
- Export Files – Pulls up a second screen for exporting playlists to a new location
- Import Playlist – This function can take a playlist saved by another program (limited to Windows Media Player or Music app outputs, I think… don’t use this much)
- Normalize – Runs the MP3Gain function on the contents of the playlist.
- Remove Displayed – Will delete the visible songs from the playlist. You can use Access’s built in filter functions on the song list to cut down what is deleted. Just right click and use the Text Filters to show just what you want to kill
Exporting Files
This is really one of the main reasons for this program to exist. For populating a thumb drive for use in a car, an MP3 player, whatever you want to take with you.
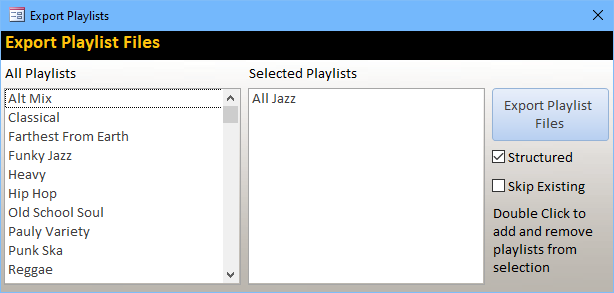
Double click to add or remove selected playlists. Everything in the “Selected Playlists” list will be exported.
Structured – This will save files to the target in the standard Artist\Album\File format and save a playlist file at the root. This is great for players that can read playlist files. Leaving this box unchecked creates a new folder in the target location and simply fills that folder with all song files, which is great for players that simply navigate by folder.
Skip Existing – This will move right along if it finds a file that already exists in the target. If you’re saving multiple playlists, this is always enabled and is only useful if you’re doing a single playlist. Otherwise, you’ll be prompted each time a file is found to overwrite or skip.
Click Export Playlist Files when ready, you’ll be shown a progress window with the file transfer status. Copying a lot of files to a USB drive can take a while, best get some coffee and come back later.