Understanding Dynamics Processing

Don’t you hate it when TV commercials are way louder than the program you are watching? Your reaction may be to turn the volume down when the commercials kick in, then back up when the program returns. What you are in fact doing is applying a very manual form of compression.
Controlling the dynamics of audio is a critical task in mixing and mastering. This is perhaps the most important thing to understand when attempting to make your home studio recordings sound like they’re professionally done.
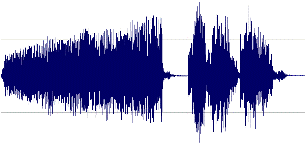
Dynamics in general deals with the loudness or amplitude of the audio signal. The difference between the loudest and softest signals is called the dynamic range. Controlling the dynamics involves manipulating the gain of your signal depending on the level of the peaks. This is exactly what compressors, limiters, and gates are designed to do.
Dynamics and relation to Loudness
The perceived loudness of your song is based on the average signal level, but in the digital world you maximum peak cannot go over full scale. If you have a 16 bit number that’s all 1’s… you can’t get any bigger than that right? The way the pro’s make their tracks louder is by cutting down the large peaks in the signal in order to make the average larger. This gives your ears a perceived loudness without using all the room for peaks. This is a controversial subject though, often called the “loudness wars”. The marketing folk know that generally people will prefer the music that’s presented to them a little louder, so they’ve decided to make everything louder. Since there’s only so many bits to deal with, getting louder and louder is causing some major label releases to be lifeless and even heavily distorted. Another side effect comes when the parts that are supposed to be quiet become just as loud as everything else. Dynamics make a song breath, they build emotion and create excitement when the tension is released with a loud blast…. all of that is killed when the whole thing is squished to 100% loud 100% of the time. That being said, there is a happy medium where you can make your music loud enough to be exciting without squeezing the life out of them.
Compressors
There are four primary settings in any compressor
Threshold – This is the level that must be reached before the compressor starts adjusting gain. Think of this as how loud the commercials have to be before you reach for the remote to turn down the volume.
The threshold setting is going to depend on the input signal level. Generally you should set it so the quietest portions of the signal sneak below the compressor while the loud peaks you want to control break over the threshold and kick in the compression.
Ratio – This is how quickly the gain will be adjusted after the threshold is reached. A 1:1 ratio means the gain won’t be adjusted at all. A 2:1 ratio will allow the signal to get louder after the threshold is reached, but only by half. So say a signal goes 6dB over the threshold, the compressor will knock half of that back down so it will only get 3dB louder. An infinite ratio means the signal won’t get any louder no matter how much more input is given past the threshold.
Setting this parameter determines how hard you want to compress the signal. Typically ratios between about 2 and 6 are normal with lower ratios being more transparent and natural sounding.
Attack – This is how quickly the compressor reacts and reduces the gain. Back to our TV example, this would be the delay between you noticing it’s gone to commercial and is therefore too loud and the adjustment of the volume.
Increasing the attack time will allow quick transients through before the compression kicks in. This is handy for percussion and drums to allow the initial snap come through while controlling the decay of the sound.
Release – This is the time it takes for the compressor to release the gain reduction after the levels return under the threshold. Similar to how long it takes for you to turn the volume back up when the program returns.
The release time should be short enough to allow the compressor to recover before the next transient is coming, so it’s roughly dependant on tempo of the material. For example, you’ll want the compressor fully recovered between hits of a drum so the sound remains consistent.
Additional options
Knee type – This changes the way the compressed signal sounds as it comes in and out of compression. A soft knee adjusts the gain gradually so it is less obvious to the ear when it kicks in.
Gain Compensation – Sometimes called “Auto Gain Compensation” will add gain to match your compression settings so the maximum peaks remain the same. This will make the track louder as you compress it further.
Limiters
A limiter is simply a compressor with an infinite compression ratio. That way the signal is limited from going any further above the threshold. This is important for controlling brief peaks in the signal. The side effect of over limiting is similar to simply clipping a signal… nasty distortion!
Multi-Band Compressors
Multiband compressors are simply multiple compressors limited to a particular, often adjustable frequency range. That way different parts of the frequency band can be compressed differently. All other parameters for each of the bands remain the same.
Gates
Gates are kind of the opposite of a compressor, often called expansion. Instead of the gain adjustment happening above a set threshold, the gain is cut below a set threshold. The primary use of a gate is to mute unwanted signals when the part your wanting isn’t actually happening. For example, a kick drum microphone may pick up bits of snare at a relatively low level. Setting a gate will mute the snare bleed between kick hits. Simple gates have a, infinite ratio, meaning the signal is muted completely below the threshold. Others may give you an attenuation amount or ratio.
Visualizing the settings
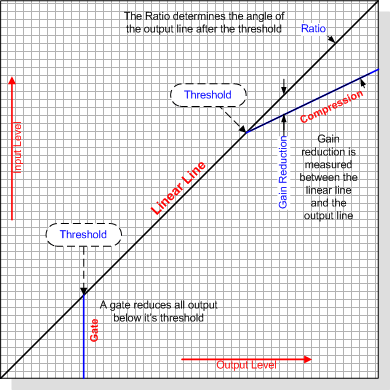
This graph shows the relationship between input and output signal levels and how they are affected by compression and gating.

A perfectly linear signal follows the 45 degree line, so for any given input voltage, the output voltage is the same. A factor may be involved for gain or reduction, however the angle will remain exactly the same so a doubling of input equates to a doubling of output. Different compressors have different interfaces to adjust these settings. This screenshot is from the Sonitus FX compressor bundled with Cakewalk Sonar and shows a graph of the settings similar to the one above.
Other compressors do not show you the graph and may have simplified control interfaces. This is a screenshot of the Waves rComp plugin which simply allows you to set threshold, ratio, output gain, attack and release and also contains a few options for the type of knee used.
Any decent compression plug in will have signal meters built in to the interface. These will allow you to see where the signals lie while adjusting the compressor.
Building your signal flow
In order to best utilize compression throughout your project and get the best volume with as little side effect and distortion as possible, it is better to spread little bits of compression throughout the project at the track, bus, and master output points. For each point, a compressor will be in the chain with whatever other effects you’re using and a limiter will be the very last item.
Track Compression – Use compressors on individual tracks, particularly very dynamic tracks such as percussion, drums, bass guitar, synths etc.
Bus Compression- Place more compression on groups of tracks mixed through a bus in order to further trim dynamics. This is great on drum mixes, groups of guitar or synth tracks etc.
Master Compression – Finally on the whole mix, another round of compression and limiting will be done to bring the final output up to the desired volume. Generally this step can be reserved for the mastering stage.
Adjusting the Settings
When setting your compressors it is important to realize that all levels and effects up the signal chain will effect the input to the compressor and therefore where your settings will be. If you have an EQ before the compressor, be sure to set the EQ first then the compressor. And if you re-adjust EQ, trim settings, or anything else before the compression, you’ll have to re-visit the compressor settings to compensate. This will vary between audio engineers, but here’s how I generally attack them:
- Set the ratio and attack/release times. I’ll adjust these based on the track, group, or mix I’m working on.
- Pull down the threshold untill the compression starts to kick in. Be aware of where the loud parts in your track and adjust the compression during peak levels.
- Bring the gain up to push the peaks back up toward the maximum. This is particularly useful if the compression plug in also has a decent limiter built in, that way you can bump the signal with a little bit of limiting ensuring hot signal levels all the way through your project.
Why can’t I use a preset?
The signal levels and dynamics are always different between tracks and can be quite unpredictable. That makes it near impossible for a preset to get the threshold and gains just right. The best case will be to have a good ratio, attack, and decay times preset but the threshold and gain will always have to be adjusted.
As with all effects, typically less is more (though this is always subject to taste and will depend on the sound you’re going for). I personally shoot for no more than 6-10dB of gain reduction and just a little bit of bumping against limiters at each stage of the mix. Getting it just right will take some practice!

A very well composed explanation of some of the most misunderstood fundamental tools of audio mixing. I found this article to be clear, direct and easy to digest. I would recommend it as an excellent read for both novice and professional.
Joel
I’ve really enjoyed reading your articles. You obviously know what you are talking about! Your site is so easy to navigate too, I’ve bookmarked it in my favourites 😀
Magnificent goods from you, man. I have understand your stuff previous to and you’re just too magnificent. I really like what you’ve acquired here, certainly like what you’re stating and the way in which you say it. You make it entertaining and you still care for to keep it wise. I can not wait to read far more from you. This is actually a tremendous website.