Anarchies – 3 Way Speaker Design Concept
Project Planning
Design Requirements
For my ideal home speakers destined for my small basement listening spot, there were just a few requirements that I wanted to hit.
- Deep bass response down to the low 30Hz range
- Compact size
- 3 way to allow the woofer to hit those low notes without affecting the critical midrange
- 8 ohm nominal for easy amplification
Woofer Selection
Generally, there are tradeoffs for the 3 requirements of deep bass, small size, or high output. You can choose 2, but not all 3. In my case, the extra loud part isn’t as important. My ears have already been abused with 30 years of music performance in rock bands, so my days of high SPL listening for enjoyment are well past. That leaves me the freedom to investigate the small number of woofers in the 6-8” nominal diameter range that can produce down to 30Hz in a reasonably small enclosure.
At the time of the initial design, there weren’t that many to choose from and 1 particular model really stood out: the Anarchy 708 by DIYSG. These diminutive monsters are well received by the DIY community as both mid-basses and subwoofers. The 4 ohm model is used in several kit designs, however the 8 ohm model is appropriate here for my easy amplification requirement.
Running models in Bass Box 6 shows the Anarchy performing incredibly well in anywhere from 0.5 cubic feet up to about 1 cubic foot. The bass extension gets dimishing returns as you approach 1 cubic foot, so anywhere in the range would be perfectly acceptable with an Xmax limit only appearing to limit power above the tuning frequency as you get to the high side of the volume.
For midrange performance, these have been used successfully in 2 way designs crossed above 1kHz so a 3 way implementation crossing under 500Hz will not be a stress at all. The manufacture doesn’t provide a lot of measurement data, so the details will be worked out once received and the build is in process.
Midrange Selection
There are generally a few things to consider when selecting a midrange for a 3 way project:
- Operate as smoothy as possible in the expected pass band
- Low distortion
- Sensitive enough to keep up with the woofer
- Size selected for best dispersion match from woofer to tweeter
There are a ton of excellent small midranges to choose from here, so ultimately this ended up based on other projects I’ve heard and general DIY folk experience. I settled on the excellent and affordable Dayton RS100-8 for the mid duties. These little buggers can make an excellent 2 way mini speaker, and even a decent single drive full range. Dayton does provide some good quality measurements for frequency response on and off axis.
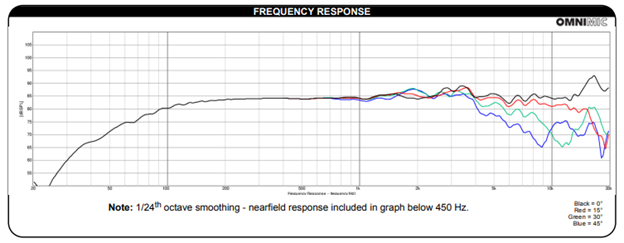
Couple things to note on there:
- These things are flat!
- Dispersion starts to drop around 3kHz where the off axis measurements really start to deviate
One gap in the data is the distortion results, however with enough folks using these things and the generally excellent performance of the Dayton reference series drivers, this didn’t concern me. We can however look to the impedance plot for where the cone causes trouble.
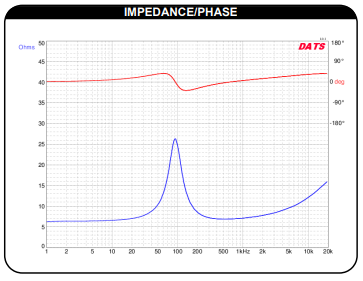
In larger woofers, you’ll typically see a blip in the impedance as cone breakup occurs with a corresponding squiggle in the frequency response. Not on these however, just a smooth rise from the inductance of the voice coil.
Tweeter Selection
For the tweeter, I had just a couple considerations.
- Soft dome, for no other reason than I like soft domes
- Smaller than 1” for nice wide dispersion accommodated by the smallish mid
- Small diameter footprint so I can mount close to the mid
Lots of choices available here, and I’m not one to pick a high cost / high end fancy tweeter so I stuck with the Dayton series of drivers. The ND20FB-4 was what I settled on, based on it’s use in many projects with high regard. It’s inexpensive, rear mount with a tiny footprint, and has an excellent smooth high end response.
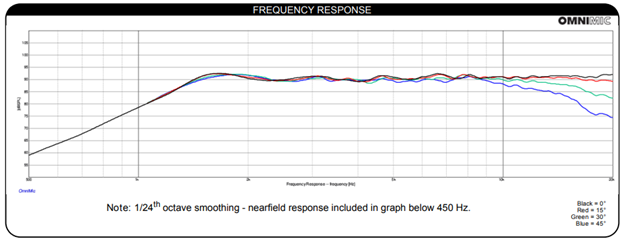
Barely a squiggle in the frequency response plot. Dispersion only starts to change above 10kHz, largely driven by the diameter more than anything else. With an expected target of 3-4kHz for crossover, this should be easy to pull off.
Note, this is a 4 ohm tweeter and only handles 15W. This is not a concern in the finished speaker. Tweeters receive only a small fraction of the total system power and are usually much more sensitive than the rest of the speaker. That means the crossover will handle padding the tweeter down to match, therefore increasing that impedance well above 4 ohms and leaving the amplifier an easy load.
Enclosure Design
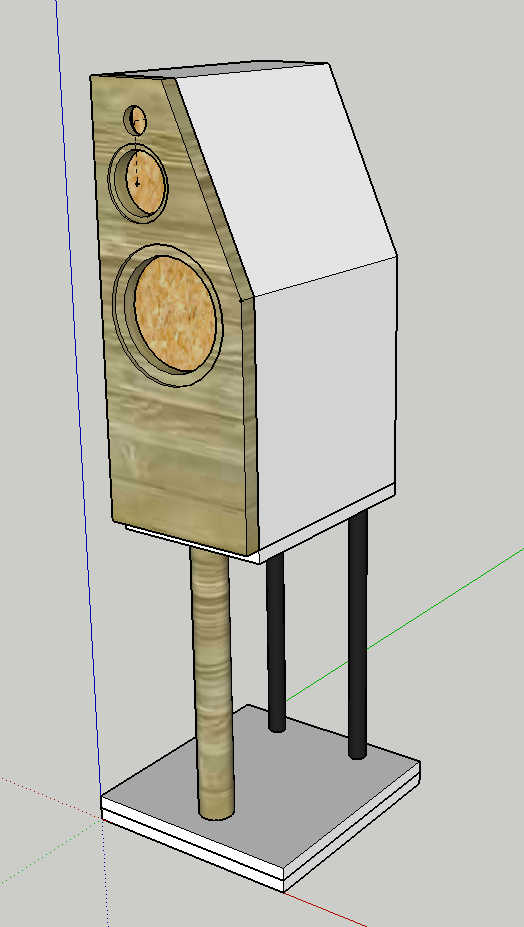
The driver selections dictated a bit about the box, giving me the appropriate size for the woofer and a minimum for the midrange. The rest of the concept was up to me, and I didn’t want another rectangle box to build. I regularly show my projects and even compete informally amongst the DIY community, and these guys include some incredible woodworkers. My little rectangle boxes so far can’t stand out against some of these creations, so I’m determined to make something that is just a bit different.
For the final concept I settled on a box on top of a box design to separate the mid and woofer. The woofer will land in a volume in that 0.5-1 cubic foot range, while the mid will have more space than it needs. The extra volume in the mid poses no issues, the low end will be a sealed alignment with a very low Q but crossed over well above any of that.
I did go back and forth with a symmetrical truncated pyramid on top, or an asymmetrical single angle.
Ultimately the asymmetrical design looked more interesting. There are a couple technical considerations, but the pro / con results of these isn’t easy to predict.
- Power response is driven by driver placement on the baffle with symmetrical producing even power response for both off axis directions. There’s some indication this is preferable.
- Asymmetric and off-center mounts can improve diffraction ripples and improve performance at the expense of some power response variation. There are also indications that this is preferable
In this case, the cabinet is asymmetrical, but the drivers are mounted in the midline, so they’re technically tipped about 16 degrees left and right. I’ve also used disparate edge treatments with the outside edges getting a ½” round over and the inside angled edge getting a ~5/8 deep chamfer. That further complicates the estimation of diffraction effects and the result on power response. Since I can’t predict it very well, I’m going to have to lean on measurements when it gets to crossover design to see what happens.
For this build the angles are slight so the final effect should be minimal. The bonus points for the cabinet design include:
- Non-parallel walls in the mid enclosure and partially in the woofer enclosure
- No matching edges to exaggerate the diffraction effects
I’m hoping the final build will not only look just unique enough to stand out of a crowd of rectangles but will also have some interesting properties for the sound where it counts in the room.
Woofer Alignment in Cabinet
With the woofer selected and the cabinet drawn up, it was time to specifically model the alignment for a sanity check. The port is planned as a 2” Precision Port kit, the large flares have been proven excellent at keeping a smaller diameter port under control and is plenty for a woofer of this displacement.
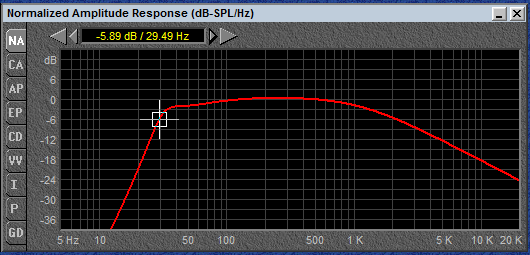
The cabinet calculates out to 0.651 cubit foot net, and runs well tuned to 34Hz. The resulting extension comes down to F3 at 33.5Hz, F6 at 29Hz which should make a nice amount of bass for a little speaker without the help of a subwoofer.
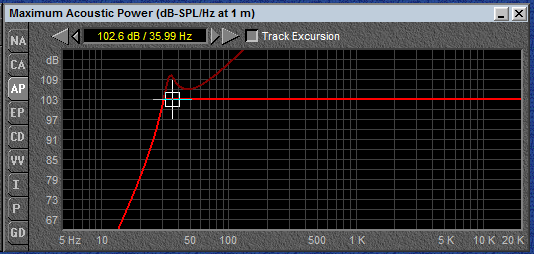
Looking at exertion, with a full 60W of input the speaker is not limited and should clock just over 102dB output 1 meter away. Not super loud, but loud enough.
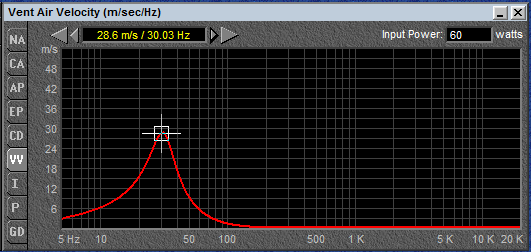
Finally, checking the vent velocity we come up to just under 30m/s at full power peaking at 30Hz. The extreme flares of the Precision Port combined with a down firing arrangement will keep any nasty port noises from becoming a problem.
Stand integration
The final challenge with the enclosure design planning is the stands. The woofer enclosure needs a lengthy port to tune appropriately, and I’m intent to avoid a bend to maximize the efficiency of the port. That means the port has to fire out the bottom of the cabinet to have the length required. To do that, the stands have to be part of the design, not just any old stand.
My old Realistic Nova’s and the Supernova Minimus that were in my listening spot have been sitting on a tripod stand made with a simple set of 3 1” dowel rods my father and I made forever ago, and I always liked the simple aesthetics.
For these, I’m opting to use a heavier front hardwood dowel, and a pair of steel pipes for the back 2 supports. This allows me to incorporate wiring into the stands for a super clean look. For the connections I’ll route banana plugs up the stands to plug into discreet jacks on the bottom of the cabinet.
For stability, the base of the stand is planned with extra width and the cabinets will be bolted to the stands removably so they are solid in place and can be broken down for transport as needed.
Up next… Anarchies Construction!
Pingback: Anarchies Finishing, Round 1 | The World of Wogg